Category Archives: Uncategorized

Master Detail App – with or without Storyboard

I’ve created two projects to demonstrate the navigation techniques I described in my previous post. If I am creating a new project and I do not have to support previous versions of iOS, then I would definitely use storyboarding. It makes navigation so much easier and consistent. If you have not come across it, I would recommend iPad and iPhone Application Development by Paul Hegarty from Stanford University in iTuneU. It is interesting, informative, educational and most importantly free. 🙂

Back to the projects. The main things I was trying to demonstrate in those projects were navigation techniques. So some of the things in those projects may not pass the quality check for production code. Please turn a blind eye on those things and I hope there is something useful for you in those projects. 

The projects demonstrate (one using storyboard and one not):

  1. loading a new master page from the current master page
  2. loading a new detail page from the current master page
  3. loading a new detail page form the current detail page

The trigger for loading a new detail page from the current detail page is a single tap (forward) and two finger tap (backward). More detailed description of how it works is available in the previous post. 

Here are the links to the projects on github.


Tagged , , , ,

Fitting in with Master-Detail Application in XCode 4.3

As a Windows developer coming to terms with iOS development in XCode, this will log my struggles in getting the basic structure of Master-Detail application for iPad  in XCode 4.3 with multiple master views and multiple detail views. As I was looking for answers, my googlefu can only find me mostly those for older versions of XCode. For example, there is no more RootViewController and no MainWindow.xib. And there are a few other details changed which made things difficult for a noob like me to follow and understand.  Let’s talk about this new structure in XCode 4.3.

I would assume you know what a Master-Detail application look like from a user perspective. I think Mail app would be be a good exmaple of its kind.

Master, Detail and the Split View Controller

At the heart of a Master-Detail application is a split view controller. When we create a new project of type Master-Detail application the following function is the generated in AppDelegate.m file.

 1: - (BOOL)application:(UIApplication *)application didFinishLaunchingWithOptions:(NSDictionary *)launchOptions
 2: {
 3:     self.window = [[UIWindow alloc] initWithFrame:[[UIScreen mainScreen] bounds]];
 4:     // Override point for customization after application launch.
 5:
 6:     MasterViewController *masterViewController = [[MasterViewController alloc] initWithNibName:@"MasterViewController" bundle:nil];
 7:     UINavigationController *masterNavigationController = [[UINavigationController alloc] initWithRootViewController:masterViewController];
 8:
 9:     DetailViewController *detailViewController = [[DetailViewController alloc] initWithNibName:@"DetailViewController" bundle:nil];
 10:     UINavigationController *detailNavigationController = [[UINavigationController alloc] initWithRootViewController:detailViewController];
 11:
 12:     masterViewController.detailViewController = detailViewController;
 13:
 14:     self.splitViewController = [[UISplitViewController alloc] init];
 15:     self.splitViewController.delegate = detailViewController;
 16:     self.splitViewController.viewControllers = [NSArray arrayWithObjects:masterNavigationController, detailNavigationController, nil];
 17:     self.window.rootViewController = self.splitViewController;
 18:     [self.window makeKeyAndVisible];
 19:     return YES;
 20: }

A view controller each for master and detail views are created namely, masterViewController and detailViewController. Those controllers are added to corresponding navigation controllers. Those navigation controllers are again added into viewControllers array of splitViewController. It is important to remember that it is the navigation controllers not master and detail view controllers themselves which are added to the split view controller here.Finally splitViewController is assigned to window.rootViewController property.

The other thing to note is detailViewController is also assigned to masterViewController’s detailViewController property which can be useful if your application has only one master. And also detailViewController implements UISplitViewControllerDelegate which handles showing or hiding of popover button on the navigation bar of the detail view as the user changes the device orientation from portrait to landscape and vice versa.

Now, I would like to switch master views as the user select items in it. That’s relatively easy. I just create more UIViewControllers and push them onto master view navigation stack like so in the event handler, assuming you use UITableView for displaying the items.

 1: - (void)tableView:(UITableView *)tableView didSelectRowAtIndexPath:(NSIndexPath *)indexPath
 2: {
 3:     ....
 4:     [[self navigationController] pushViewController:secondMainController animated:YES];
 5: }

That way, you can keep drilling down into multiple level of master views. In this case, I do not want to keep passing the detailViewController as I change master views. I think it is just unwieldy and I might forget to pass it on at one point. Now assume, I have reach the item I want in the master view, I would like to bring up the corresponding detail view. I was stuck there for a bit as I could not figure out how to tell detail view to switch to this new view I want.

Devil in the detail

Then I notice there is splitViewController property in all UIViewController objects. It is in master, sub master, detail everywhere. UIViewController class reference says
“If the receiver or one of its ancestors is a child of a split view controller, this property contains the owning split view controller.”. My thought at the point was, if I could get to split view controller, which has an viewControllers array propery, I could get to detail view.

According to the above function in AppDelegate.m, controller for master view is at index 0 and detail view is at index 1. So I got my detail view controller. So I thought and did something like:

 1: [[detailViewController navigationController]
 2:     pushViewController:myNewDetailViewController animated:YES];

The code above fails to bring in the view I like, My main concern at that point was not getting the correct split view controller and not getting the correct viewControllers property. But after a few debug rounds, I confirmed I was getting the correct split view controller and viewControllers property with 2 controllers in it. That was because. as you may notice, controllers added to viewControllers array in splitViewController are navigation controllers, not view controllers. So there is no need to call [self navigationController] again. So the code becomes,

 1: UINavigationController *detailNavigationController =
 2:     [[self splitViewController] viewControllers] objectAtIndex:1];
 3: [detailNavigationController
 4:     pushViewController:myNewDetailViewController animated:YES];

Don’t push my buttons

At that point, I got the detail view I want showing up when I select an item in master view. However, there is one problem. I do not want the back button added to the navigation bar of my new detail view by the navigation controller. It is just standard behaviour of the navigation controller to provide back button when a new view is pushed onto the stack. I need the popover button to be displayed instead of back button. I do not need back navigation in the detail view anyway.

The first thing I need to do was to not push view into navigation stack but replace the existing view. Here is how I have it, with ideas I of course, got from applying my googlefu .

 1: UINavigationController *navController=[[UINavigationController alloc] init];
 2: [navController pushViewController:newDetailViewController animated:YES];
 3:
 4: NSArray *viewControllers = [[NSArray alloc] initWithObjects:
 5:                                 [[[self splitViewController]viewControllers] objectAtIndex:0],
 6:                                 navController,
 7:                                 nil];
 8:
 9: [[self splitViewController] setViewControllers:viewControllers];

The idea is to replace the whole navigation controller not just the stack inside it. I created a new navigation controller with the view I want at the top. And create a new array of view controllers with master navigation controller at index 0 and new navigation controller at index 1. And assign the array to viewControllers property of splitViewController. Then I have my new detail view displayed with the back button on navigation bar.

So my next quest is how to get ahold of that popover button to be added to the new detail view.

Sanity in the end

I got that sorted too and I put all those functionalities required to swap detail view into a category extending the UISplitViewController as followed:

 1: #UISplitViewController+RightNavigationController.h
 2: @interface UISplitViewController (RightNavigationController)
 3:
 4: -(void)changeDetailViewWithController:(UIViewController<UISplitViewControllerDelegate>*) viewController;
 5:
 6: @end
 7:
 8:
 9:
 10: #UISplitViewController+RightNavigationController.m
 11: #import "UISplitViewController+RightNavigationController.h"
 12:
 13: @implementation UISplitViewController (RightNavigationController)
 14:
 15: -(UIBarButtonItem*)popPopoverButton{
 16:     UINavigationController *detailNavigationController = [[self viewControllers] objectAtIndex:1];
 17:     UIViewController *detailViewController = [[detailNavigationController viewControllers] objectAtIndex:0];
 18:     UIBarButtonItem *popoverButton = [[detailViewController navigationItem] leftBarButtonItem];
 19:     [[detailViewController navigationItem] setLeftBarButtonItem:nil];
 20:     return popoverButton;
 21: }
 22:
 23: -(void)changeDetailViewWithController:(UIViewController<UISplitViewControllerDelegate>*) viewController{
 24:
 25:     UIBarButtonItem *popoverButton = [self popPopoverButton];
 26:
 27:     UINavigationController *navController=[[UINavigationController alloc] init];
 28:     [navController pushViewController:viewController animated:YES];
 29:
 30:     NSArray *viewControllers = [[NSArray alloc] initWithObjects:[[self viewControllers] objectAtIndex:0], navController, nil];
 31:
 32:     [self setViewControllers:viewControllers];
 33:     [self setDelegate:viewController];
 34:
 35:
 36:     [[viewController navigationItem] setLeftBarButtonItem:popoverButton];
 37: }
 38:
 39: @end

Do not forget to implement UISplitViewControllerDelegate in the header files of the new detail views you are creating. The two function  required to be implemented for that delegate  can be pretty much copied from the default detail view implementation. If you find your new detail view does not have “masterPopoverController” which is used in the copied functions, you could delete those lines requiring “masterPopoverController”. If you do not implement “UISplitViewControllerDelegate”, you will lose the popover button when switching device orientation back and forth.

There are assumptions made which might not work for you. It assumes view controller at index 0 of viewControllers property in splitViewController is main navigation controller and index 1 is detail navigation controller. the view controller at index 0 of viewControllers array in detail navigation controller is the detail view controller and there is only one view. The left bar button item on nvaigation bar of detail view controller is the popover button. If these assumptions work for you, this solution might not be too bad.

Links to demo projects are available in next post.

Tagged , , ,

Unit Testing Lambda Expressions

Recently, I was trying to find an easy and effective way to test the query filters as lambda expression passed from one object (e.g. service) to another (e.g. repository). Let me describe my problem statement in a little more details. I had a repository backed by LINQ to NHibernate and it exposed functions which accepted lambda expressions as query filters. For example, a typical ‘Find’ method would have following signature in repository, in this case IUserRepository.

 1: IList<User> Find(Expression<Func<User, bool>> filter)

A service layer function would pass lambda expressions to those repository functions to get the required object. For example,

 1: public IList<User> GetUsersEligibleForLoyaltyDiscount()
 2: {
 3:     return _userRepository.Find(user => user.LoyaltyPoint >= 1001);
 4: }

How would I test this service function to make sure it passes the correct lambda expression to repository using NSubstitute? The easiest thing to compare string representation of lambda expression to expected value.

 1: [TestMethod]
 2: public void UserWithMoreThan1000LoyaltyPointsAreEligibleForDiscount()
 3: {
 4:     //arrange
 5:     Expression<Func<User, bool>> expectedFilter = (user => user.LoyaltyPoint >= 1001);
 6:     Expression<Func<User, bool>> actualFilter = null;
 7:     _userRepository
 8:         .Find(Arg.Do<Expression<Func<User, bool>>>(filter => actualFilter = filter))
 9:         .Returns(new List<User>());
 10:  
 11:     //act
 12:     _userService.GetUsersEligibleForLoyaltyDiscount();
 13: 
 14:     //assert
 15:     Assert.AreEqual(expectedFilter.ToString(), actualFilter.ToString());
 16: }

This approach is fairly stable. Differences in terms of whitespaces would not cause the test to fail. And also when you decide to turn random number 1001 into a constant like any reasonable person would and the test would still pass.

 1: public IList<User> GetUsersEligibleForLoyaltyDiscount()
 2: {
 3:     return _userRepository.Find(user => user.LoyaltyPoint >= MinRequiredLoyaltyPointsForDiscount);
 4: }

Cool, it could not be easier. So I thought. However, it has its limits. We cannot use the same approach to test the following service method.

 1: public IList<User> GetUsersBornOn(DateTime date)
 2: {
 3:     return _userRepository.Find(user => user.DateOfBirth.Date == date.Date);
 4: }

Testing it using the same approach as below would not work.

 1: [TestMethod]
 2: public void WhenGettingUsersByDateOfBirthOnlyDatePartIsUsed()
 3: {
 4:     //arrange
 5:     var date = DateTime.Now.AddYears(-19);
 6:     Expression<Func<User, bool>> expectedFilter = (user => user.DateOfBirth.Date == date.Date);
 7:     Expression<Func<User, bool>> actualFilter = null;
 8:     _userRepository
 9:         .Find(Arg.Do<Expression<Func<User, bool>>>(filter => actualFilter = filter))
 10:         .Returns(new List<User>());
 11:  
 12:     //act
 13:     _userService.GetUsersBornOn(date);
 14:  
 15:     //assert
 16:     Assert.AreEqual(expectedFilter.ToString(), actualFilter.ToString());
 17: }

Upon closer inspection, it is revealed that the string representations are no longer matching because the variable used in lambda expression is prefixed with the class it is defined in.

 1: expectedFilter.ToString()
 2: "user => (user.DateOfBirth.Date == value(ExpressionTree.UserServiceTests+<>c__DisplayClass4).date.Date)"
 3: actualFilter.ToString()
 4: "user => (user.DateOfBirth.Date == value(ExpressionTree.UserService+<>c__DisplayClass0).date.Date)"

One crazy approach that I tried was to directly manipulate Expression object to get what I want. But it surely is not scalable and is a pain to read. For example, to get the right operand of == operator, I would do the following.

(PropertyInfo)((MemberExpression)((BinaryExpression)return5.Body).Right).Member

That is when there is only one statement in the lambda expression and it is but one part of the statement. Surely, there must be another way. After much struggling and googling (maybe my googlefu is not as strong as I think), I did not get any good direct answer. Then the light bulb lit up and here is the way I think is easiest and most reliable.

 1: [TestMethod]
 2: public void WhenGettingUsersByDateOfBirthOnlyDatePartIsUsed()
 3: {
 4:     //arrange
 5:     var date = DateTime.Now.AddYears(-19);
 6:     var userBornOnDate = new User {DateOfBirth = date.Date};
 7:     var userBornEarlier = new User {DateOfBirth = date.Date.AddDays(-1)};
 8:     var userBornLater = new User { DateOfBirth = date.Date.AddDays(1) };
 9:  
 10:     Expression<Func<User, bool>> actualFilter = null;
 11:     _userRepository
 12:         .Find(Arg.Do<Expression<Func<User, bool>>>(filter => actualFilter = filter))
 13:         .Returns(new List<User>());
 14:  
 15:     //act
 16:     _userService.GetUsersBornOn(date);
 17:  
 18:     //assert
 19:     var compiledActualFilter = actualFilter.Compile();
 20:     Assert.IsTrue(compiledActualFilter.Invoke(userBornOnDate));
 21:     Assert.IsFalse(compiledActualFilter.Invoke(userBornEarlier));
 22:     Assert.IsFalse(compiledActualFilter.Invoke(userBornLater));
 23: }

Using this approach, we are testing the end result, what rather than how. The test is specifying the criteria for the filter passed to repository. As long as the filter meets the criteria, it does not matter how the filter is constructed. I think this approach would be able to handle complex expressions easily.  By not delving too deep into the implementation of the test subject, the test might become a bit less brittle as well. Please share your thoughts in the comments.

Tagged , ,

ECMAScript 5 – Part II

Next feature introduced in ECMAScript 5 is sealing or freezing objects. In the previous post, we looked at how to prevent a property from being deleted. What if we want to prevent deleting any property of an object? We can use new ‘create’ function defined in ‘Object’ like:

 1: var person = Object.create(Object.prototype, {
 2:                 name: { value: "John Smith" },
 3:                 dateOfBirth: { value: new Date(1971, 9, 4) }});
 4: delete person.dateOfBirth;

‘dateOfBrith’ property cannot be deleted at line 4 because all omitted attribute descriptors have false value by default.Object.create function has the following signature:

 1: Object.create(prototype, {(n:attrs)*});

If we use simple object literal to define properties, they cannot be marked as undeletable later. For example:

 1: var person = {
 2:     name: "John Smith",
 3:     dateOfBirth: new Date(1971, 9, 4)
 4: };
 5: person.dateOfBirth.configurable = true;
 6: alert(person.dateOfBirth.configurable);
 7: delete person.dateOfBirth;

We will see ‘false’ in alert dialog but ‘delete’ statement on line 7 will still be successful (at least in Chrome which I am using for testing). Now let’s find out what ‘freeze’ does. It will mark all properties of the object as “writable:false” and “configurable:false”. In other words, all properties of the object are now read-only and cannot be deleted. It also calls ‘Object.preventExtensions’ function for the object. No new properties can be added after that.

 1: var person = {
 2:     name: "John Smith",
 3:     dateOfBirth: new Date(1971, 9, 4)
 4: };
 6: Object.freeze(person);
 8: person.name = "Joe Bloggs";
 9: delete person.dateOfBrith;
 10: person.title = "Mr";

Writing to a property (line 8), deleting a property (line 9) and adding new property (line 10) will all fail. Please note that it also works with objects defined using normal object literal.However, ‘freeze’ will only affect all direct properties of the object and all properties from the prototype chain. It will not affect the properties of properties. It is shallow freeze. For example,

 1: var person = {
 2:     name: "John Smith",
 3:     dateOfBirth: new Date(1971, 9, 4),
 4:     address: {
 5:         streetName: "Grand Boluevard"
 6:     }
 7: };
 8: Object.freeze(person);
 9: person.address.streetName = "Broadway";
 10: alert(person.address.streetName);
 11: person.address = {streetName : "Esplanade"};

We will see ‘Broadway’ in the alert dialog. But line 11 will fail because address property is marked read-only by ‘freeze’ function.If we want deep freeze, we would have to manually traverse all the properties and call ‘freeze’ on each. In the above example, we can call ‘Object.freeze(person.address)’ so that street name becomes read-only.

But I am thinking an object which is read-only may not be exactly what we need. What if we only want to prevent more properties being added to the object or removed from it, just like a normal C# object. There is an app a function for that, called ‘seal’ and defined in Object. It will not change the writablility of the property. All properties which are writable before call to ‘seal’ will remain writable.

1: var person = {

 2:     name: "John Smith",
 3:     dateOfBirth: new Date(1971, 9, 4),
 4: };
 5: Object.seal(person);
 6: person.title = "Mr";
 7: delete person.address;

In the above example, adding new property to person (line 6) and deleting an existing property from person (line 7) will fail. These features allow the object creator more control to define how the object should be used without comprising the flexibility where required. As far as I can see, there is no ‘thaw’ or ‘unseal’ function. And writablilty of a property can only be set at the time of property creation and cannot be changed afterwards except for ‘freeze’ function. There is also a nice article on temper proofing objects which discusses these features.

EDIT: ‘freeze’ and ‘seal’ do not affect children along the inheritance chain. In the following example, even though ‘person’ is frozen, ‘employee’, child of person, can still be manipulated to have an extra property ‘position’. ‘name’ property can be removed from ‘employee’ too but that causes the property from parent to shine through.

 1: var person = {
 2:     name: "John Smith",
 3:     dateOfBirth: new Date(1971, 9, 4),
 4: };
 5: Object.freeze(person);
 6:  
 7: var employee = Object.create(person, { employeeNumber : {value: "A1"}});
 8: employee.position = "Admin";
 9: employee.name = "Joe Bloggs";
 10: delete employee.name;
 11: delete employee.__proto__.name;

At line 9, when we change ‘name’ of ‘employee’, ‘name’ property in person is not affected, We are only changing the ‘employee’ copy of the property. After line 9, ‘employee.name’ is ‘Joe Bloggs’. When ‘employee.name’ property is deleted, ‘name’ property from person shines through, i.e. ‘employee.name’ becomes ‘John Smith’ after line 10. Line 11 triggers an exception, because ‘person’ object is frozen.

Tagged ,

ECMAScript 5 – Part I

I am going to base this post on a Google Tech Talk ‘Changes to JavaScript, Part 1: EcmaScript 5’ and ’Changes to ECMAScript, Part 2‘. The followings are the new APIs included in ECMA Script 5. I will write this post in series as I go through the videos. These will also be my notes / study guide for future reference.

First before we get started, the committee decided to remove some ‘warts’ from previous versions but the new version should not break all existing web pages. The answer is “use strict” directive. It is mostly subtractive. It restricts you from using those deprecated parts of ECMAScript which are usually insane, irregular or bad parts anyway. It is pretty much like VB ‘Option Strict’ statement or perl “use strict;” pragma. It allows me to tell the JavaScript engine to stop me when I wander into those unruly parts, if I choose to. All existing scripts will still function in new version without “use strict” directive. However, you do not need to have it to start using new functionalities in ECMAScript 5.

So what’s new in ECMAScript 5. First  up is getter/setter.

Currently, it is hard if not impossible, to have a calculated property in a javascript object. We could have a function which returns the value we want but it is a function. For example, a person object has date of birth property and we also would like to expose age property which is calculated based on date of birth property. We can write something like this:

 1:     var person = {
 2:         dateOfBirth: new Date(1972, 4, 5),
 3:         age: function () { return new Date().getFullYear() - this.dateOfBirth.getFullYear(); }
 4:     };
 5:     alert(person.age());

Did you notice the brackets? person.age is a function and we must invoke it to get the value we want. In the new version, we can achieve what we want using enhanced object literal.

 1:     var person = {
 2:         name: "John Smith",
 3:         dateOfBirth: new Date(1971, 9, 4),
 4:         get age() {return new Date().getFullYear() - this.dateOfBirth.getFullYear();},
 5:         set age(value) { this.dateOfBirth.setFullYear(new Date().getFullYear() - value);}
 6:     };
 7:     alert(person.age);
 8:     person.age = 41;

This bring JavaScript closer to other OO languages. In jQuery for example, we may no longer need to call same ‘val()’ function without parameter to get the value and with parameter to set the value. And for some people, this is one of the basic things the language didn’t get right. This also enables read-only and write-only properties. In the above example, if we do not have ‘set age(value)’ function on line 5, line 8 will cause an error. If we do not have ‘get age()’ function on line 4, on line 7 person.age will be ‘undefined’.

However, there is a loop hole. What if I delete the existing age property and replace it with my own ‘do whatever you like’ property.

 1:     delete person.age;
 2:     person.age = 10;
 3:     alert(person.age);

Not surprisingly, other people have thought of it too and there is now an answer to that problem in version 5. Enter the realm of attribute descriptors.

 1:     var person = {
 2:         name: "John Smith",
 3:         dateOfBirth: new Date(1971, 9, 4)
 4:     };
 5:  
 6:     Object.defineProperty(person, "age", {
 7:         get: function () { return new Date().getFullYear() - this.dateOfBirth.getFullYear(); },
 8:         set: function (value) { this.dateOfBirth.setFullYear(new Date().getFullYear() - value); },
 9:         configurable: false
 10:     });
 11:     alert(person.age);
 12:     person.age = 50;
 13:  
 14:     delete person.age;

In the above example, configurable attribute on line 9 is telling JavaScript engine that age property cannot be deleted and so delete call on line 9 will cause an error. Object.defineProperty function has the following signature. If we want to define a simple (non-calculated) property, we do not have to write getter/setter functions. We can use ‘value’ attribute and just set whatever value we want it to have. Also note that defineProperty function is defined on ‘Object’ object, not on Object.prototype. It is said to be done that way for security reasons. That’s why we have to pass the object we are dealing with as first parameter. Wouldn’t it be nice if defineProperty function is defined on Object.propotype so that we can just call person.defineProperty() with two parameters instead of three? Well,  it is already a lot better so can’t complain.

 1:     Object.defineProperty(o, n, attrs)
 2:     attrs ::= { value:v,
 3:                 writable:b,
 4:                 enumerable:b,
 5:                 configurable:b}

enumerable attribute controls if the property would be included when looping through the object as below:

 1:     for (var prop in person) {
 2:         alert(prop);
 3:     }

The attributes omitted in attrs will have false by default. So that’s all but one small part of ECMAScript 5.

As for closing note, John Reisg has a nice article on ECMAScript 5 Strict Mode, JSON, and More. According to that article, we can start including “use strict” directive on all new JavaScript code we write or in any existing JavaScript code we modify. In the older browsers which do not support it, it will simply be ignored. So we still need be diligent and not rely on “use strict” directive so much, until all browsers support it.

Tagged ,

Setting up SQL Server Reporting Services

I was recently given a task to migrate existing reports created using Client Report Definition (.rdlc) to SQL Server Reporting Services. Currently, the reports are part of the Web solution and are displayed in the report viewer control in a Web Form page.

By moving them to SSRS, we can take full advantage of its functionalities such as subscription, exporting to different file formats (e.g. PDF, Excel, etc.), and security among others.SSRS reports(.rdl) can be made available in the web application through report viewer control just like Client Report Definition files (.rdlc) with a few configuration changes.

The main thing to consider before moving to SSRS is the retrieval of data required by reports. In client version, the web application code is responsible for providing data to the report. The web application code can use stored procedures, ORMs, dynamic SQL statements, in memory manipulation of POCOs or any combination of those.

When we move the reports to SSRS, it is responsible for data retrieval. Ideally, we would retrieve all data required by the reports using stored procedures or dynamic SQL statements. Even though SSRS can consume web services or WCF, they should only be considered as last resort because there are limitations in those approaches.

First, I needed to install SSRS from SQL Server 2008 R2 install disc. Since I had SQL Server already installed, I had to go with file only installation option and manually configure it after installation using  Reporting Services Configuration Manager. It is fairly straight forward but make sure Web Service URL and Report Manager URL are setup properly. I was not aware that the administration of SSRS was done in the browser and tried to connect to SSRS using SQL Management studio. To perform administrative task on SSRS, the browser must be run as Administrator.

So far, I got SSRS installed and Web Service URL and Report Manager URL working. What’s next? How do I convert .rdlc to .rdl? Can I just rename the file and be done with it? According to this MSDN article, I needed something called Business Intelligence Development Studio which I later found out is a cut down version of Visual Studio 2008. I went back to SQL Server 2008 R2 installation disc and installed it.

After installation, I created a new report project, copied .rdlc files as .rdl to a folder under the new project and included those .rdl file in the project. I went through each of those reports and move data retrieval and any processing logic from C# code in web solution to  T-SQL stored procedures and statements. When I got the reports running fine in preview mode, I deployed them to local SSRS from BIDS. Once they are in SSRS, I changed the code for loading the reports into Report Viewer in the web site to look for the reports in SSRS.

I then needed to check in the new report project which I could not do from BIDS because we are using TFS 2010. According to MSDN forum discussions, I needed to install team explorer 2008, Visual Studio 2008 Service Pack 1 and Forward Compatibility Update for Team Foundation Server 2010. That put me between rock and a hard place. Installing all those things in all development machines could be a painful experience and could be the final nail when there were some resistance to the SSRS move in the first place.

Without installing them, I could check in my new report project in VS 2010 just as files and folders, not as a solution. Then, when I needed to check out a report or add more reports, I had to do all things TFS in VS 2010 before I switched to BIDS to do real work. Because it was checked in as files and folders and I had to worked out which files needed to be checked in or checked out each time manually. Judging from the comments in Microsoft connect site, it seemed a lot of people had been bitten hard by this issue.

The other thing to consider is how to integrate the deployment of report project into existing CI setup.I used RS utility, which processed a VB.NET file provided as input. The recommended extension for the script file is .rss but it is not recognised by either VS 2010 or BIDS meaning no syntax hilighting for you. I kept the file extension as .vb and RS utility was none the wiser.

I wrote my script using the sample provided in this article. ‘rs’ variable available in script is of type ‘ReportingService2005’. There is also a third party utility called ‘RSScripter’ which generates .rss file for you. After that, it is just a matter of adding a call to ‘rs’ utility as a build step in CI tool of your choice.

Tagged , , ,

A short trip in Selenium

Selenium 2 has adopted minimalist approach in terms of API. It is a good thing for us the developers that we only need to remember a few things. At the same time, it can be a bad thing if it restricts you from doing what you want. Using Selenium, most of the common tasks involved in UI testing can be easily done using simple API. In this article, I am going to record the workarounds I used for the current UI testing project I am working on.

The first issue is not strictly related to Selenium. There are data collection pages in the website which warn the user that the page is dirty on body unload event using confirm dialog. I have implemented some scenarios in which I was checking how the form reacts to erroneous user inputs. When I close the browser at the end of the scenario, the warning is displayed because the form is dirty. The browser does not close down because it is waiting for confirm dialog. As the confirm dialog is trigger by webDriver.Quit() call, I have lost control of the browser at that point and I cannot interact with confirm dialog anymore.

My workaround is to visit home page at the end of the scenario and if the current form is dirty, the confirm dialog box will appear. Since I am using SpecFlow, I implemented that procedure in [ScenairoTearDown] method. However, I could not assume the dialog would always appear in all scenarios and I had to warp driver.SwitchTo().Alert() call in try catch block. After the home page is loaded, I can call webDriver.Quit() knowing nothing is going to popup and stop the browser from closing down.

Secondly, in Selenium 2 there is only type (SendKeys) function, no paste function. There are some scenarios in which paste is more desirable. For example, you might want to simulate the user pasting some text into the text box. Or you might want to reduce the number of AJAX calls triggered by each keystroke which do not contribute to your test case. I found the following answer in stackoverflow and it served me well.

private void SetValue(IWebElement element, String value)

{

((IJavaScriptExecutor)driver)

.ExecuteScript(

“arguments[0].value = arguments[1]”,

element, value);

}

The next issue was about stale elements. WebDriverWait class does not handles StaleElementException well. For example, I wanted to wait for certain text to appear in the table cells rendered by AJAX callback as below:

WebDriverWait wait = new WebDriverWait(driver, TimeSpan.FromSeconds(10));

wait.Until<IWebElement>(d => d

.FindElements(By.CssSelector(“table .ajaxResult tbody tr”))

.FirstOrDefault(tr => tr

.FindElements(By.TagName(“td”))

.Any(td => td.Text.Contains(“some text”))));

Sometimes, I would get StaleElementException thrown from Until function. It seems the table row collection become stale as more rows get rendered. As suggested by many people in forums, I tried out extending WebDriverWait class and wrapping Until method in try catch block which simply calls itself if StaleElementException is caught.

The other problem which I struggle with is Selenium does not do well when the element of interest is partially hidden. There is a form which is slightly longer than the screen height. As I am filling in the form using SendKeys method the screen would scroll down bit by bit. At some point, I need to click the link at the top of the page which is now partially out of viewport. When I call Click() on that element, nothing happens. If the link is completely out of viewport, Selenium would bring that into viewport and then click it. It seems auto scroll function and click function has different way of calculating if something is in viewport.

Using the Selenium IDE and Export test case as -> C# (WebDriver) function, I could see that the generated code call Click() twice consecutively when the link is completely out of viewport. However, it still does not help with partially out of viewport scenario. MoveToElement and MoveByOffset methods in Actions class only move the mouse pointer but they do not actually scroll the page into position. The only thing I could do to resolve this is to call SendKeys(string.Empty) before calling Click(). On the link elements, SendKeys does not have any effect other than bring them into viewport completely. Once they are in viewport, Click function would happily click them.

After all these, I thought if FireFox driver would do things differently and decided to try out running the website in FireFox. The website uses windows authentication and runs in ASP.NET development server.  I had to add the base address as trusted uri in FireFox profile so that it would not prompt for user credentials on first visit. I also noticed UI tests were running way slower than in IE. After a little bit of searching the internet, I found the article which suggested turning off IPv6 in FireFox profile which worked a treat.

FirefoxProfile profile = new FirefoxProfile();

profile.SetPreference(

“network.automatic-ntlm-auth.trusted-uris”

, baseAddress);

profile.SetPreference(“network.dns.disableIPv6”, true);

var webDriver = new FirefoxDriver(profile);

Last but not least, if your UI tests suddenly stop working for no apparent reason, just make sure your browser is displaying in 100% view mode. What I experienced was that one day the buttons were not clicked anymore and in vertical menu item, the items above the ones I specified were  wrongly clicked. I checked if any changes in website or UI test caused these problems. I even checked if any windows updates for IE were installed. After much pain and suffering, I accidentally noticed the browser was running in 105% view mode. Next time, I will have a little more faith in our codebase. 🙂
Tagged ,

Wrestling with Razor Checkboxes

I am new to ASP.NET MVC and Razor view engine. Today, I got to fix the issue where the disabled checkbox value which is being set in javascript triggered by actions on other form controls, was not posted back to the server. First off, I thought, of course, when the control is disabled it would not get posted, duh!  So I thought that should be simple. All I needed was a hidden control which was synchronised with the disabled checkbox using some jQuery magic. To keep the model binder happy, I gave the hidden control the same name as the disabled checkbox.

However, I am not getting the correct value in my model. My model property for the checkbox was always false even though I see the checkbox being ticked in the form and my hidden control having correct value before posting. Upon closer inspection of ‘View Source’ in the browser, I found out that the checkbox html helper is also generating a hidden control with the same name. As explained in this stackoverflow post, it was a general pattern used in Rails as well  to post ‘false’ when the checkbox is not ticked because html specification says unchecked checkboxes are not successful.

Without fully understanding the pattern, I thought, the hidden control I needed had already been generated and I did not need to add more myself. I would simply change the hidden control value to ‘true’ when the checkbox is ticked in javascript. It worked ok and ‘true’ was posted to the server and the model binder would bind correctly. It all seemed happy. However, I noticed, when the form is rendered with the disabled checkbox ticked, after saving, the associated hidden control had ‘false’ value. So if I posted that form back without any javascript being triggered to synchronize the checkbox with the hidden control, ‘false’ would be posted to the server and the tick was lost again.

Through more frantic googling, I found the post which explained how model binder dealt with the checkbox and hidden control. When the checkbox is checked, the value in the form collection is ‘true,false’ and when unchecked the value is simply ‘false’. The model binder is smart enough to grab just the front part of ‘true,false’ as the actual value when the checkbox is ticked.

At this point, I had two options. First option was to synchronise the disabled checkbox with hidden control on document ready so that the hidden control value would be ‘true’ when the disabled checkbox is ticked at the beginning and the later actions which changed the checkbox state would also set the correct value in the hidden control. That would work but it deviated from the original intent of the hidden control pattern. As I understood it, the role of the hidden control was to hold ‘false’ value. It was never meant to have ‘true’ value. Manual synchronisation also seemed unwieldy to me and I was suffering because I was going against the flow or the original intent.

The second option was to include the checkbox twice as below:

@Html.CheckboxFor(model => model.IsLoggedIn, new {style=”display:none”});

@Html.CheckboxFor(model => model.IsLoggedIn, new {disabled=”true”});

It is arguably a hack. So when the form was posted, I would receive ‘true,false,false’ if the checkbox was ticked and ‘false,false’ when it was not. The model binder would bind the value as I expected as well, ‘true’ when ticked and ‘false’ when not. The order of the checkboxes was also important, the hidden one had to come first.

However, I still had to synchronised the two checkboxes, one not displayed and one disabled. Because the checkbox was disabled, it could only be set through javascript. So I thought I might not need any changes at all if I had the following line setting the value:

$(“#IsLoggedIn”).val(someValue);

Both checkboxes, hidden and disabled, had the same Id and so jQuery Id selector should find both and set them the same value. Wrong! According to the API document, Id selector would only return the first matched element if there are multiple elements with the same id. An element id should be unique within the document ideally.  So did I change the Id of the two checkboxes to be different like a good netizen? No, that would be too much work! Instead, I changed the selector:

$(“input[id=’IsLoggedIn’]”).val(someValue);

Now both checkboxes were set at the same time and everything was happy.

If you have another way around this, please share with us. If you had the same problem, please share your experience with us too.

Tagged , , ,

Specflow and Selenium Synergy

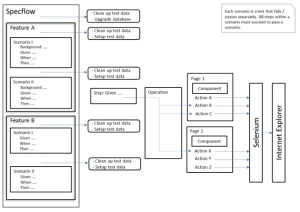
As I mentioned before, I was setting up a UI testing framework for an internal website suing Specflow and Selenium. One thing I have to mention here is we were not doing BDD yet. But we were using UI tests to help us with regression testing. The following is the diagram I used to explain to the team who were new to UI testing and Specflow how I structured the test project.

Specflow and Selenium setup

Specflow and Selenium setup

A scenario is a test in terms of test framework such as MS Test.  In my opinion, using Specflow when we are not doing BDD still delivers the following benefits:

–          better organisation of test cases as scenarios and features which fitted well with user stories,

–          test specification written in plain English readable to non-programmers,

–          an executed specification which hopefully would not get out-dated.

As I had it in the diagram, Specflow is the starting point both in terms of writing UI tests and also in terms of executing them by test framework such as MS Test. To start implementing a new test case, we would write a scenario we wanted to test in plain English using Gherkin syntax of Given, When and Then statements. Those statements (steps) are then translated into user actions in the web application, for example a step saying “Given I am in ‘X’ page” could be translated as:

var homePage = new Application().StartWithDefaultCredentials()

homePage.MainMenu.SelectX();

In the above code sample,  StartWithDefaultCredentials() method is what I call an operation. An operation is a logical collection of user actions. In this case, StartWithDefaultCredentials() method can be broken down as :

–          start up the browser

–          navigate to home page and you will be redirected to login page

–          type default user name

–          type default password

–          click login button etc.

By encapsulating all those actions in one logical operation helps us avoid code duplication and hence allow easier maintenance.

homePage is an instance of a page class and MainMenu property is a component. The pages and components are put in place to hide the detailed interaction with browser from the others. For example, SelectX method of the main menu can be broken down as:

–          find the link with id ‘menuX’

–          click the link.

Actual detailed implementation of finding the link ‘X’, using id or CSS selector or XPath query is encapsulated in the MainMenu component.  When the UI layout changes and ‘menuX’ becomes a button, for example, then there is only one place we need to change i.e. in MainMenu component. This is one major benefit of coding those layers versus simply using Selenium test recorder IDE. When using the test recorder, a change like this would require re-recording all the test cases which touch the main menu or require global string replacement if lucky.

From the outset, all we see is those scenarios written in plain English passing or failing. One thing we have to make sure is the actual intent of the test does not get lost in translation between layers. In an ideal circumstance, Specflow scenarios can be written by a business analyst and a programmer would translate those scenario steps into user actions probably making use of the pages and components implemented by other programmers. Even when there is only one person involved there is still a chance of things getting lost in translation. It begs the question of who is testing the UI test code!!

Tagged , ,

Setting up Specflow and Selenium for UI testing

I am setting up a UI testing framework for an internal website using Specflow and Selenium 2. I am going to log the steps I performed for my own benefit later.
Firstly, I created a normal test project in C#. To setup Specflow, all I needed to do was to include it in the project through NuGet. It downloaded all necessary dlls and included references to them in the project. That’s all that was required to run Specflow project. However, it did not add Specflow file templates to Visual Studio. To get them, I needed to download and install msi file from Specflow website. For CI server, installation of msi file was not required because all dlls required to build the project were already included in NuGet package.
Out of the box, Specflow works with NUnit. I would like it to work with MS Test because all other unit tests were written in MS Test and we also did not want to install another component in Build Server. To use MS Test with Specflow, I included the following section to App.config file of the test project.

<specFlow>

<unitTestProvider name=”MsTest” />

</specFlow>

For Selenium, it was pretty much the same story. I included 2 Selenium packages from NuGet, Selenium.WebDriver and Selenium.Support. Selenium 2.x  API for .NET does not require any Java components, unlike version 1. Adding references to Selenium dlls was all that required to drive the browser in version 2.x.

Another important aspect of UI testing is test data integrity. In UI testing, we try to simulate how the actual user would interact with the application. That usually involves reading and writing data to some sort of data store. To allow easier maintenance of test code, it is recommended to start each test with known set of test data and not to rely on data produced by other tests. A test in UI testing can be defined as a scenario in a feature or a path through the application we want to safeguard.

In this case, we are using Microsoft SQL Server as data store. Initially, my plan was as followed:

  1. Create a clean slate database (schema and lookup data only)
  2. Back it up as baseline
  3. Upgrade it to latest database changes in the trunk
  4. Create new baseline backup including latest changes
  5. Insert test data
  6. Take a snapshot of everything up to this point.

In this plan, steps 1 and 2 have to be done only once.  Steps 3 to 6 would be done once at the start of the test run for every run. And also, at the start of each scenario (test), the snapshot is restored so that each one starts with known test data.

The wrench thrown into this plan was FileStream. The website was storing all attachments uploaded and files generated in FileStream. According to MSDN, when a snapshot is taken for a database which uses file stream, it only creates snapshots of standard (non-FILESTREAM) filegroups. The FILESTREAM filegroups are marked as offline in those snapshots. Such snapshots cannot be restored to their original database because FileStream may become out of sync with data included in snapshot.

So I thought, what if I do complete backup of the database including test data at step 6 and restore that backup at the start of each scenario instead of snapshot restore. This plan got me through a little bit further. I could start each scenario with known test data. But I noticed the first test in each test run was failing with error message saying ‘A transport-level error has occurred when receiving results from the server. (provider: TCP Provider, error: 0 – The specified network name is no longer available.)’. It was as if the website could not connect to the SQL database. All subsequent tests ran fine.

Later I found out it was due to restore, more precisely, taking the database down to single-user mode to enable restore. When the database is taken down to single-user mode, connections held by ASP.NET in its connection pool were invalidated, hence called single-user mode. However, ASP.NET has only one way of knowing the connection has been cut off by the server. That is to connect to the server and pray it works. When the connection fails it marks that connection as bad and does not return it to the pool. Next time the website tries to connect to the database, a brand new connection is created. That was how the first test was failing and the subsequent tests were passing. SqlConnection.ClearAllPools() did not help because MS Test and ASP.NET were obviously in separate App Domains.

As a last resort, I settled with clean up scripts which required more maintenance in my opinion. At the start of each scenario, clean up scripts were run to remove any test data left behind by a previous test. After cleaning up, I would re-insert the test data for the current scenario. I could do the cleaning up at the end of each scenario but I felt doing it at the start was the safer option. As a side effect, I could check the state of the database at the end of last scenario which I think is useful.

At the end, I do away with all backups steps (2 and 4). I ended up with the script to create the database complete with lookup data from nothing. When required, I would delete the whole database and recreate it from scratch using that script. After that I would upgrade it to the latest version and all was well. Once a stable test environment is setup for UI testing, I would not need that script either. The cycle will be:

  • At the start of each test run
    1. Clean up test data
    2. Upgrade to latest version
  • At the start of each scenario
    1. Clean up test data
    2. Insert test data
    3. Run the scenario

That was all the ground work done.  After that I could really start writing actual UI tests. The next entry would be on how I structured the code in UI test project and things I had to consider.

Tagged , ,